Octowire: Getting started
Hello hardware hacker community,
As you probably know, we have publicly released the first version of our hardware exploration tool : the Octowire. You can shop it now at : https://shop.octowire.io
The “Getting started” guide!
This is a meant to serve as an entry point for anyone just discovering Octowire.
This guide quickly presents the main aspects you need to understand to start working with the Octowire.
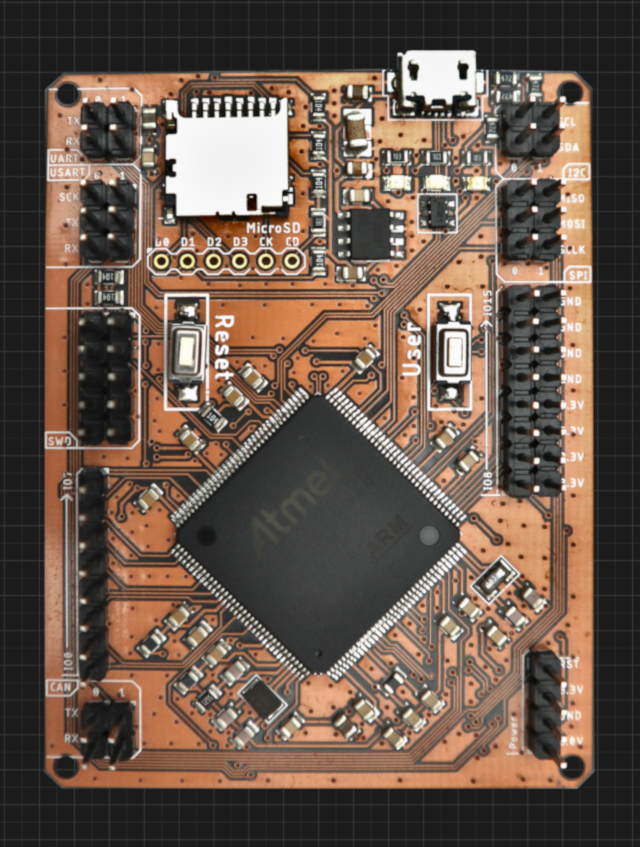
What is this?
The Octowire environment makes it easy to interface most common hardware busses, protocols and interfaces.
The actual Octowire device offers a “bridge” between a host computer and targets (electronic devices).
A powerful and extensible command-line environment (the Octowire framework) allows interacting with targets through the Octowire hardware device.
Together, they provide a simple yet powerful toolkit to learn, hack and reverse-engineer electronic systems.
A fully documented Python library offers an easy-to-use API to control the Octowire directly from your code.
Extensible by design and built around an open-source architecture, the Octowire framework makes it a breeze to add support for additional custom interfaces.
The framework also includes a set of modules to cover many basic use cases right out of the box.
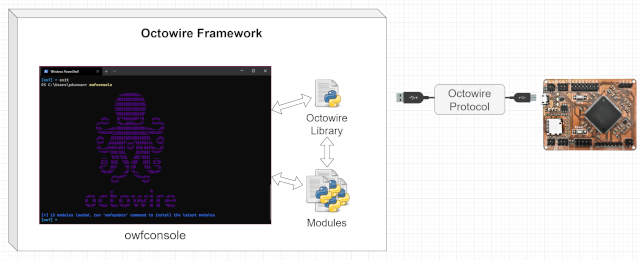
Communication with the host computer
The Octowire uses USB for communication with the host.
To make it easy to use in as many environments as possible, the Octowire presents itself to the host as a high-speed generic USB CDC (Communication Device Class) serial port (UART) interface.
Basically, it appears as a new “COM” port in Windows, or as a new “/dev/ttyUSB” device in Linux.
By default, the Octowire communicates at a baudrate of 7372800.
In order to keep things as simple and stable as possible, the communication itself is made up of:
requests – messages sent from the host to the Octowire
responses – messages sent back from the Octowire to the host
Exchanges are synchronous and initiated by the host. A request is first sent by the host, which then expects a response from the Octowire.
Two modes of communication are offered: text mode and binary mode. Text mode allows easy operation by humans while binary mode offers faster communication when controlled from software.
Switching between modes is accomplished with the use of a special opcode (“binmode” / 0x01).
Text mode
Text mode is the default, and is intended for human interfacing.
As the name implies, requests are sent as text, delimited by newline characters.
These newlines can be either \r (0x0d) or \n (0x0a) (or both), but when sending the responses, the Octowire always sends \r\n to avoid confusion.
The requests themselves are simply words separated by spaces. The first word is the opcode name, possibly followed by any number of arguments (depending on the opcode itself).
Responses are also sent back as text, including the response code.
Here is an example of a simple text-mode exchange – setting an output GPIO “high” (logical value 1, electrical level 3.3V):
HOST > io 10 hi
OCTO > OK!
In the example above, no specific information is returned by the “io” opcode. Only a response code is given.
Another example is shown below, where the level of an input GPIO is read:
HOST > io 6 rd
OCTO > OK!
OCTO > 0x01
Here, the response code (“OK!”) is followed by some additional information: the value of the input pin that we read.
Binary mode
Binary mode is reserved for programmatic operation by the library or some piece of software running on the host. It offers faster performance and a more “machine-friendly” message format.
In binary mode, requests have no explicit delimiter. Rather, they are prefixed with the length of their arguments. This allows the receiving end to safely receive a request even if it doesn’t know the specific opcode (allowing for forward-compatibility).
As mentioned previously, the response code is always sent first, before any additional response data.
The binary mode request format is therefore:
| <ARGS_SIZE [uint16_t]> | <OPCODE [uint8_t]> | <(ARGS [ARGS_SIZE])> |
|---|---|---|
| 16 bits | 8 bits | ARGS_SIZE bytes |
Responses work in the same fashion. Same as for text-mode, the first element to be sent is always the response code. The response code is a single byte (uint8_t).
| <RES_CODE [uint8_t]> | (<RES_DATA [???]>) |
|---|---|
| 8 bits | Size depends on response contents |
Library
A Python library is available to allow easy interfacing with the binary mode offered by the Octowire hardware.
The complete library documentation can be found here: https://github.com/immunIT/octowire-lib/wiki
Octowire Framework
Although the Octowire can be used directly from a terminal in text-mode, running complex tasks against electronic systems can become tedious to do by hand.
This is where the real strength of the Octowire ecosystem appears in the form of a highly-extensible command-line tool: the Octowire framework.
The framework allows using high-level “modules” which package and simplify operations into easily reusable components to achieve increasingly complex tasks.
Many generic and common use cases are already covered out of the box by the set of pre-included modules such as:
- Logic sniffing
- SPI flash access
- I2C flash access
- AVRISP programming
- SD/MMC card I/O
- UART (serial)
New modules are constantly being added to the collection to cover more uses.
Writing your own modules for custom situations is surprisingly easy, with examples and documentation available to help you do exactly what you want.
The framework itself and associated documentation can be found here: https://github.com/immunIT/octowire-framework
Framework installation:
Installing the framework will require the following: Python (at least 3.7), pip (for python3), python3-requests, python3-setuptools.
It can be installed (with administrator/root privileges) using the following one-liner :
# Windows powershell (as Administrator)
curl.exe -s https://raw.githubusercontent.com/immunIT/octowire-framework/master/install.py | python

# Linux (as root)
curl https://raw.githubusercontent.com/immunIT/octowire-framework/master/install.py | python
The framework can also be installed in a Python virtual environment. In this case, administrator/root privileges are not required.
Install / update modules and framework
Simply run owfupdate in your terminal (as admin or in a virtualenv).
Framework usage
You can start the framework console by typing:
owfconsole
You should get a screen that looks like this:

We will quickly go over the few main keywords.
The framework use auto-completion, do not hesitate to tap the `TAB` key.
Typing the `help` command at any time gives the following:

A list of available modules can be obtained with the show modules command.
The results can be filtered by appending a category name to the previous command as shown below.

The search command can also be used to find the desired module.

Once the desired module has been found, it can be selected with the use command.

show options and show advanced commands return options associated with the currently selected module.
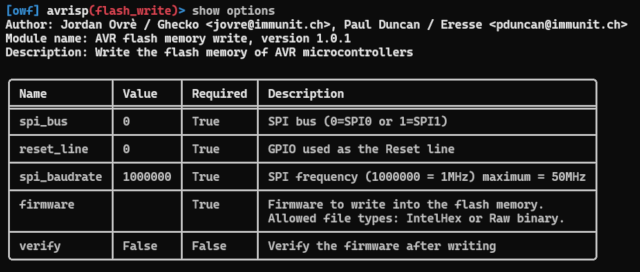
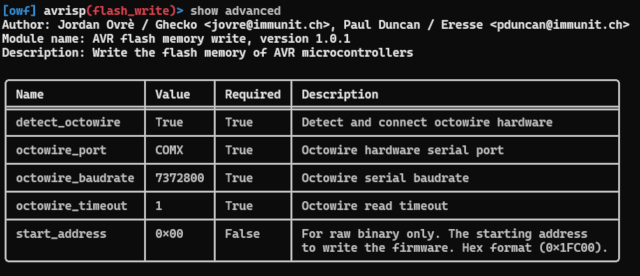
Then, the set command allows setting the options. For the example below, we are using a “raw binary” firmware and setting up the advanced option “start_address” to write a piece of firmware at the right place in the flash memory of a microcontroller.
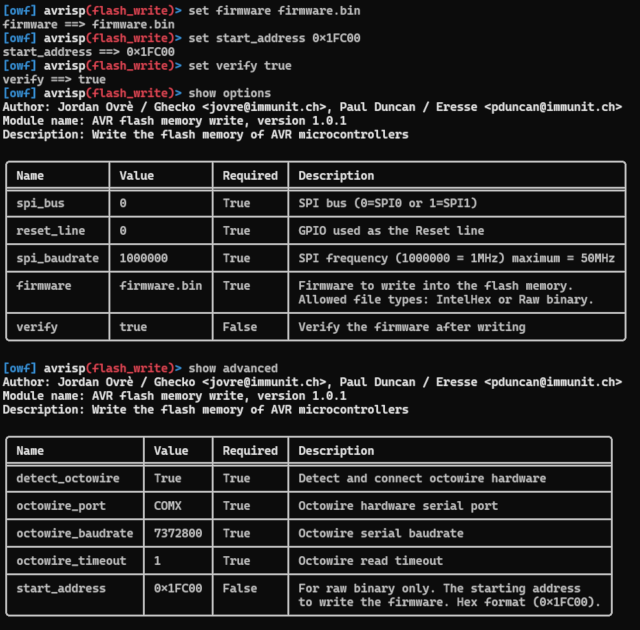
In the example here, the target is connected to SPI bus 0 and the reset line is GPIO 0; the framework will try to detect the Octowire port automaticaly (`detect_octowire` option).

nor
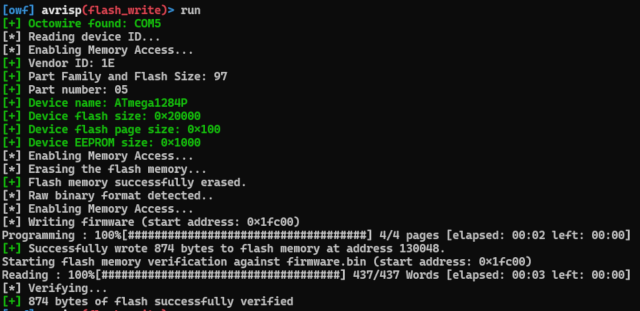
Finally, the module can be run with the run command.
The result should look like the picture below.

Comments are closed.